New-Build Bracing Sheet Edge Fixings at Frame Stage
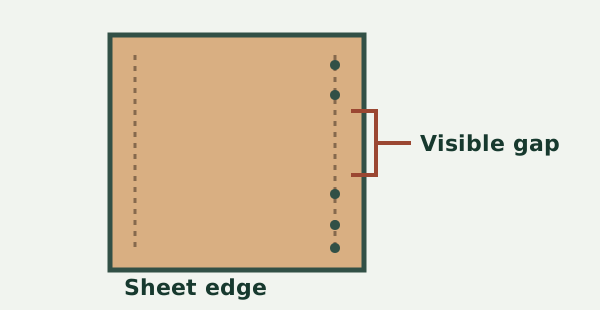
Your builder says the timber frame is ready for inspection, but one edge of a wall bracing sheet seems to have very few fixings. You can see a line of marks in the sheet and one head stands proud. Is it an incomplete wall, a small cosmetic issue or the finished detail? A visible fixing line needs to be read against the bracing detail for that exact panel. Ask for the current drawing and identify the location before the wall is lined. That gives the builder a question they can answer while the panel, the framing and the neighbouring work are still visible.
Identify the panel before assessing how it was fixed
Sheet material on a frame may be specified as structural wall bracing, or it may perform another role. From the doorway, panels with similar colour and surface texture can look alike. A sheet stamp, product label or delivery record may help identify it. The bracing plan tells you which part of the wall the designer expects to contribute to resistance to sideways forces. Ask the builder to identify the bracing type, the plan revision and the relevant detail. Where a product or placement changed, ask where that change has been documented.
The Melbourne frame stage inspection guide describes the broader inspection scope. In this instance you are trying to match one visible panel to the current bracing schedule. That means using a location every person can recognise. “Southern side of the study wall next to the opening” is more helpful than “the sheet on the far side”. If the drawings use grid lines or wall identifiers, copy them into the item description. Include which face you could see when the observation was made. The builder may have marked installed panels with corresponding identifiers that can be checked against the drawings.
Look at the boundary and the supporting frame together
A continuous line of fastener heads can be seen from an accessible face, but the detail also depends on what the fasteners connect to. A line may follow a sheet edge that lacks visible backing from the inspected side. A joint visible from the front may be supported in a way you cannot see without access to the other face. If there appears to be a gap between a sheet and frame member, record the location and how much of the interface was visible. Ask for an accessible view or relevant evidence before making a firm claim that backing is absent.
WoodSolutions’ guidance on timber bracing explains that permanent bracing helps the frame resist sideways loads. Its technical guide on moisture-affected timber frames highlights sheet edges where fasteners connect the sheet to the framing. That explains why the location and apparent condition of the edge matter. It does not give you the design capacity of the wall in front of you. To check a specific detail you still need project documentation and the applicable product instructions, and design questions belong with the relevant designer or engineer.
Record the visible pattern without inventing a tolerance
A visual check can record an apparently incomplete fixing run, a gap in a regular line, a head that stands proud or damage near a fastener. Separate those descriptions. A dark mark is not always a fastener. An apparent gap may be a partly obscured head, and the camera angle can make a head appear closer to the edge than it really is. The inspector can describe what the accessible view shows and compare it with the selected detail where the relevant documents and visibility are available.
Do not borrow a fixing interval from another house or assume that more fixings automatically improve the wall. The spacing and edge location shown in a particular system are part of the detail. Some patterns distinguish between panel boundaries and intermediate framing, and a supported joint may have its own requirements. Pryda’s installation guide illustrates how arrangements and connections are specific to particular prefabricated wall bracing systems. It is an example of why the relevant system and edition must be identified. It should not be applied to an unrelated product or an engineered variation. If the plan and product documents appear inconsistent, ask the builder to obtain clarification from the appropriate designer before the installation is covered.
Distinguish missing fixings from other signs at the edge
The framing stage may present several separate issues in one area. A visible split or damaged edge should be noted even if the pattern of heads appears regular. A panel that looks swollen after rain raises a different question about the material and the condition of the connection. Record the location and approximate extent from a safe viewing point and give the builder the opportunity to establish whether any review is needed. The overview of common frame stage concerns gives context for keeping individual items separate in the builder's response list.
An out-of-line frame does not by itself explain the fixing pattern. If the wall also appears bowed or out of alignment, record it as a separate observation with its own location. The guide to frame alignment observations explains what those checks look at. At a corner there may also be tie-down, blocking or connections to adjacent members. Those should be considered against their own details. A photo showing new fixings on one edge does not show what was done at every other connection.
Agree the check before the wall changes
Ask the builder when the wall wrap, services or lining are due to cover the area. Even a short gap between tasks can make a large difference to what is accessible. If the frame is still being worked on, agree which panels are ready for assessment and how incomplete work will be recorded. Avoid approaching an active work area or handling a panel to see if it moves. If access is unavailable because of the work sequence, ask whether the builder can arrange a suitable time or provide dated photographs with clear location references.
Some connections may be obscured before the inspector arrives. A document or photograph can show an earlier stage, but confirm how it links to the current panel. If the builder is arranging multiple inspections, the construction stage inspection guide explains why checking visibility and sequencing matters. If wrap and cladding follow framing on the same elevation, the frame-to-lock-up transition guide gives extra context on work that may soon become concealed. Keep the person responsible for access informed so a return visit does not arrive after the next trade has started.
An illustrative example at a study wall
Imagine a study wall next to a wide opening. The bracing schedule shows a panel at the left side. At the inspection the panel has visible fixings across its top and inner edge, and the view of the outer edge is partly hidden behind stored material. The inspector records a gap in the visible fixing line near the opening without calling the full panel incomplete. The builder supplies a drawing and moves the obstruction when the area is safe to access. The current schedule gives the builder a way to check which fastener pattern should have been used at that location.
After reviewing it, the builder explains that one edge had been left for a later fastening pass. The follow-up record can identify the panel, the location of the gap and the information used to check the completed detail. If someone proposes a different fastening method or the edge has already split, that decision may require documented advice from the designer or product supplier. A photograph after the work can show visible completion of the area the camera captures. It does not independently certify the capacity of the assembly. The sample inspection findings illustrate how a report makes visible findings and follow-up distinct.
Ask for a response linked to each original observation
If the builder issues a response list, compare it with your location notes. “Bracing complete” may refer to all panels on a floor, while your item concerns one side of one panel. Ask for confirmation of the drawing revision and response at the original location. If pictures are supplied, request a wide identification view and a detail view showing the relevant edge. Where the report says a connection could not be seen, distinguish any later photographs from an inspector's own observation at a return visit. Clarify which details would still require a project-specific design decision or access from the other side.
A useful sequence is to identify the panel, compare the visible work with the documented detail, and record what remains unseen. Send ClearScope the site address, frame inspection timing, current bracing plan and any location photos obtained safely with permission. Tell us when access is available and what is due to cover the wall. Ask us to confirm the scope and the kind of follow-up evidence that would suit your concern. If the question is about design capacity, a substituted product or a repair to damaged bracing, ask the builder to involve the appropriate designer and keep that advice with the inspection records.
Before the follow-up, check whether inspection of one face will be enough. A junction beside a large opening may be visible from the room, while the supporting timber at the edge is visible only from the outside. If the site team needs to provide safe access from both sides, settle that before scheduling the check. Ask whether any temporary obstruction can be relocated by site personnel when the area is safe. Where an edge will be covered, a note of the order in which work will be done can help the builder retain evidence from a useful angle.
A close-up can also exaggerate a small section and lose the relationship with the wall as a whole. If records are available, keep the first photograph of the full panel and the current drawing together with any close-up. Label each image with the date, location and direction of view. After an item has been addressed, use those same labels to identify which part has been checked. When the response refers to a revised detail, ask for the revision and the person who approved it so later review starts from the same information.
Keep the item open in your notes until the response identifies the panel and addresses the original observation.
References
Ask ClearScope about your inspection
Send the address, build stage and frame inspection timing.
Request an inspection