New-Build Cladding Sheet Joint Support Before Render
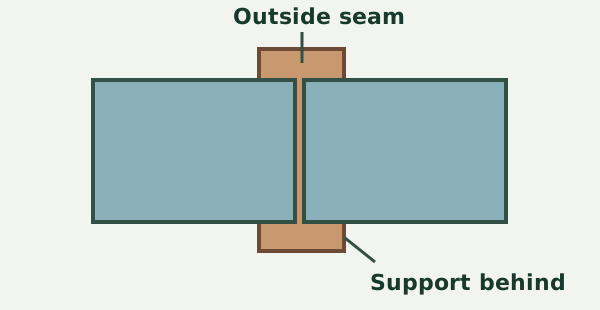
A fibre cement sheet has been installed on the outside of your new home. Near a window, two sheet edges meet along a straight line, but the work behind them is partly hidden and the texture coat is booked. Do the sheets have the support their system calls for, or will the finish conceal a detail that nobody has checked? A neat line on the face of a sheet does not establish what supports the joint behind it. Ask for the current product detail, photograph the location only where you have permission and arrange the relevant review while access is still available.
Identify what the wall is meant to be
The first question is which cladding system the builder has installed. Similar-looking sheet products can have different instructions for backing, framing, joint preparation and surface finish. A label on an offcut can help, but an offcut alone may not identify the material used on the entire elevation. Ask the builder to confirm the product from the specification and check whether any substitution was documented. Find the relevant elevation and note where the joint lies in relation to landmarks such as an opening, storey line or corner. Ask for the current product guide and project detail to compare with the installation.
James Hardie’s Hardie Tex Base Sheet installation guide is one concrete example. The guide requires all sheet edges in that particular system to be supported. This provides a useful reason to check whether the supporting work was present before covering the junction. It is a product requirement, so it should be used for that product and the applicable installation, rather than treated as a blanket specification for every sheet cladding. The manufacturer’s product page also describes the base sheet as part of a texture-coated system. Confirm the installed system and the appropriate version of its instructions before drawing a conclusion.
Work out which sort of joint you are seeing
A line where two boards meet is not always the same kind of junction. The project can specify a set joint to be covered by the finish, a movement joint that needs a particular termination, or another detailed transition where the cladding meets a different material. Ask the builder to identify the joint type on the drawing or manufacturer’s detail. For a joint that must accommodate movement, the final appearance alone cannot establish that it was arranged correctly. Avoid assuming a flush-looking finish was intended everywhere or asking the finisher to close up a joint before knowing its purpose.
Compare joints in the same part of the wall only where their type is known. One near a corner may be clearly backed in the accessible framing view. Another next to a window could have separate support or a different configuration dictated by the opening. That difference is worth describing. If the opening also raises questions about flashing, the guide to window flashing defects explains why the visible cladding junction should be considered alongside, but separately from, the weatherproofing detail of the opening.
Inspect the support that can actually be seen
Support is behind the face of the sheet. From inside the building, parts of the wall might be visible before services or lining block the view. If access is safe and coordinated by the builder, an inspector can relate the interior frame position to the seam outside. A view can be limited by wall wrap, building geometry or a section that is already covered. An apparent gap in visible backing is worth locating even if the extent cannot be checked. Use words that reflect the view available, such as “support at the mid-wall junction not verified” when backing cannot be established.
A line of fixings on the outer face does not automatically establish what those fixings connect to. Equally, a section without exposed heads may already be partly treated or photographed from an angle that conceals them. The inspection scope should document how the observation was made. The Melbourne frame stage inspection service describes inspection of exposed framing and visible connections. For a question about structural bracing sheet fixings rather than cladding support, see the bracing sheet fixing guide. The two types of sheet serve different purposes and should be checked against their own details.
Separate backing from finish and clearance
You may notice that the sheet faces do not sit at quite the same level or that a line appears in the finished surface. It is possible that the underlying arrangement, frame plane or treatment needs further review. A visual irregularity does not identify the cause by itself. Where the finishes have already been placed, photos from before they were applied may help establish what was installed. Check that they show the same elevation and joint, and ask what work has changed since they were taken. A photo of a neighbouring area does not resolve what is hidden at the point in question.
If the concern is where the bottom of the cladding meets paving or garden soil, use the external cladding ground clearance guide for that separate decision. If it is the attachment of a flashing or the treatment around another material, identify that item separately. Keeping the observations distinct helps the builder ask each trade the right question. A texture-coat contractor might explain their preparation and finish, while the builder and cladding installer can clarify what support was provided before the coat was applied. Describe where those responsibilities overlap instead of assuming one trade has evidence of every layer.
Arrange the review around when work will be concealed
Find out when the cladding and finish work are expected to proceed, and what can still be seen from a safe position. If the build is at lock-up, the Melbourne lock-up inspection service can explain the agreed visual scope and access. A staged visit may make sense if one elevation remains exposed and another has already been enclosed. Ask the builder which location can be safely viewed, what installation records are available and whether the inspection needs coordination with other work going on at the time.
The Building and Plumbing Commission’s practice note on mandatory notifications and inspections explains the statutory inspection process. The applicable permit and the relevant building surveyor determine what inspection arrangements apply to the project. An independent visual report documents what can be inspected within its scope and does not replace the surveyor’s role. If the builder says an inspection has already been completed, ask which stage and which items were described. A report that identified the exposed frame at one point in time may predate a later cladding change. Clarify the exact construction sequence if you are relying on earlier images or documentation.
An illustrative example at the rear elevation
Imagine a rear wall with a sheet junction just above a wide window. The outer seam is visible and the coat has yet to be applied. The builder states that the specified base-sheet system is installed. From inside, the area is partly concealed by another assembly, and the inspector cannot see the full section of backing that the project detail calls for. The inspection records that the seam was accessible from the ground and that its support could not be fully checked. That leaves a clear question for the builder while the work is still in progress.
The builder then provides dated photos of the backing, identifies the opening and supplies the cladding detail. The photos show the same window geometry and support position, so they can be assessed for relevance. If they show only one end, ask how the rest of the joint was supported and whether another view or site attendance is available. If a departure is confirmed, any response needs to be tied to the correct local detail and the project’s responsible people. The inspection report examples show how an observation, its limits and the requested follow-up can be stated without assuming a defect that has not been verified.
Record enough detail to be able to close the item
Ask for a written response that identifies the elevation, joint and drawing or product detail used. If the claim is that the joint was supported all along, ask what shows it. If work was required, ask what changed and what remained concealed afterwards. If a different system or detail is proposed, ask how that decision is documented before the texture coat conceals the work. Do not pry at sheets or move construction equipment to get a better view. Ask the builder to coordinate the inspection while the relevant parts remain visible.
Send ClearScope the site address, cladding system if known, the elevation you are concerned about and the proposed coating date. Include the project detail and permission for any site photographs you provide. Note whether you can see the inside face of the wall as well as the outside seam. If access is already gone, explain what records are available so the visual limits can be discussed at booking. Ask which questions can be answered at an inspection and which require input from the builder, designer, manufacturer or relevant surveyor.
If the next trade is ready to attend, make the timing explicit in your message. Ask the builder when the detail can be reviewed safely and who will confirm the response. When a response includes more than one joint, list each separately so a photograph or written note can be matched to the original observation. That is particularly useful where the same sheet finish is being used on front and rear elevations with different details. A clear record makes it easier to decide whether any further review is useful before the surface is finished.
If the cladding is already finished, ask whether there is a record from the installer describing the installation sequence and any departures at the location. A finished surface changes what an inspector can assess without disturbance. If there are marks or damage after completion, take a dated record from a safe position and ask whether earlier photographs show the matching area. Begin with that comparison before assuming the visible symptom comes from a particular layer. Where records conflict, ask the builder for the latest project detail and a response tied to the specific joint.
Include the relevant drawing reference in the inspection notes so another person can find the exact joint later.
References
Ask ClearScope about your inspection
Send the address, build stage and lock-up timing and cladding system.
Request an inspection