External Cladding Too Close to Finished Ground
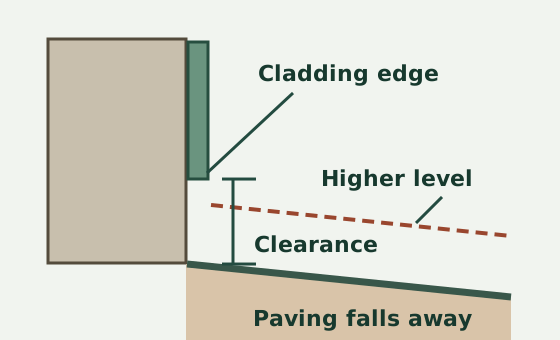
Your new house has a neat line along the bottom of the cladding, and the landscaper wants to bring paving up to the back door. Before the levels are locked in, ask where the top of the paving will sit against the bottom of the wall system and where water will go when it rains. The gap you can see over bare soil can shrink when the final surface goes in. This is worth resolving while the wall edge is visible and the paving or garden profile can still be adjusted.
Read the base of the wall as an assembly
Start by identifying the cladding and the wall behind it. The visible outer surface could be fibre cement sheets or weatherboards, timber, a proprietary rendered panel or another system. At the bottom you may see a board edge, trim, flashing or cavity closure. A metal lip can be part of a detail that sheds water from behind the face. An opening may be part of the documented drainage path. Ask the builder for the specific base detail before treating a gap as something to fill or assuming a trim can be removed. Identify where the sheet actually ends if a coating or trim hides its edge.
Look for changes along the same elevation. The base of the wall can step down at a garage or change detail where the cladding meets brickwork. A narrow paved side path may start low at one end and end high at a gate or step. Identify those transitions in photos and match them to the elevations. The detail that works against an open garden may need a separate review where another surface or structure sits immediately below. Our guide to cladding penetrations covers another point where the exterior finish and concealed water-management details need to be coordinated before they are covered.
Compare the actual surface with the proposed finish
Use a common reference, such as an agreed level on the slab or an identified point on the drawings. Ask the builder to show the intended finished level at the wall beside the door, at the ends of the run and at any point where the paving changes height. Keep a dated note of what surface you measured from. Bare ground, a temporary layer of crushed rock and finished concrete can sit at different heights. Soil and mulch can also rise in stages after handover, so ask which level the garden contractor is allowing for when they quote.
Record the cladding edge and nearby surface separately. The most useful record shows where a measurement was taken, which part of the base detail was visible and whether the adjacent surface was existing, proposed or finished. Take a wider image of the fall direction and any drain opening where access is permitted. A close photo of a tape at the wall helps explain the vertical gap but gives very little information about where runoff travels. At a step, record which tread or landing is closest to the wall. Our garage threshold inspection guide gives a companion example of comparing outside levels, water movement and a door transition.
Check the document for the installed system
Ask for the product name and current installation document applicable to your job, along with the approved detail and the proposed paving or landscape levels. James Hardie’s Australian external cladding technical specification gives separate clearances for earth and for several hard surfaces, and says the cladding should be kept away from standing water. That is a useful demonstration of why surface type matters. Check that the manual covers the installed product and project detail. A dimension taken from a different wall system or a drawing that omits the adjacent surface cannot settle the location you are looking at.
The ABCB Housing Provisions Standard for NCC 2022 also distinguishes different ground conditions for the wall cladding it covers. In its paved example, the provisions refer to the surface falling away in accordance with the relevant drainage provision. Treat that as a prompt to check the actual approved design, applicable code edition and compliance pathway with the builder and building surveyor. Your project may rely on another detail or assessment. Ask which drawing and product instruction support the installed arrangement, especially at a doorway or level transition. For a build with a brick veneer return, the brick cavity inspection guide explains a different base drainage issue. Keep the brick and sheet cladding details identified separately on the sketch.
Follow the water path beside the house
A concrete strip can look tidy while pitching towards the wall. Runoff can arrive from elsewhere too, such as a higher driveway meeting the side path or a landing that drains towards one corner. The Building and Plumbing Commission explains that rain falling on paving and driveways is part of a property's stormwater. During inspection, consider where the water arrives, where it goes and whether a channel or outlet is accessible. If an inlet is intended to intercept runoff at a doorway, ask for the installation and connection details. An inlet visible from above gives no direct view of its full discharge path.
At the wall base, persistent splashback, soil piled against the finish, marks beneath an outlet or a visibly covered drainage opening can justify a closer check. Those are observations to record, with their exact locations. The next question is whether the surface profile, product detail or adjacent work needs attention. An elevated garden bed beside a wall may also obscure an inspection zone relied on by a termite management system. The BPC termite guide warns that building up garden beds or mulch against walls can make termite entry harder to detect. Use the actual termite system documents to identify the inspection zone for your house and ask a qualified specialist where it is unclear. Read our guide to observing drainage around a home for ways to document water paths without disturbing the building.
Pick a stage when the problem can still be seen
At lock-up stage, some wall bases may be accessible for a close look while flashings, openings and unfinished grade can still be compared. Give the inspector the drawings and explain which external works are scheduled later. If the paving contractor has marked a proposed height, ask for it to be shown against the same reference as the builder's drawing. An inspection before paving can flag an apparent conflict and help you request a coordinated detail. A record taken at this stage cannot establish the final clearance when the adjoining surface has yet to be built.
Where paving and landscaping are included in the construction contract, plan to compare them again at a suitable later visit, such as a PCI or handover inspection when those works are complete. If you have engaged a separate contractor after handover, keep the location photos and product detail so they can check against the proposed profile before starting. Ask each contractor who will confirm the final level and drainage at the wall. Avoid making changes to the cladding or covering openings while the cause of a conflict is still being reviewed. Raising a surface, changing a threshold and altering a base trim can affect different parts of the assembly.
Illustrative example of a paving decision
Imagine the rear wall ends above a temporary gravel strip, and a new path will connect the side gate to the patio. The proposed path line rises near the patio so the two surfaces meet smoothly. When marked on the wall, the new line leaves the tightest space beside the patio step, where the drawing shows a base detail different from the rest of the elevation. The inspector records the proposed line, photographs the base and identifies the detail reference. Ask the builder and paving contractor to work from the same section drawing so the door transition, cladding edge and water path can all be reviewed before the path is laid.
Suppose the final detail keeps the path lower at the cladding and places the level transition farther out from the wall. A later inspection can record the visible clearance and direction of fall at the completed surface. Ask who confirms that the documented detail applies and how any drainage outlet has been checked. If the surface has already been laid and the base edge is partly hidden, ask for progress photos and product details before anyone opens the wall. Visible observations can guide a follow-up, and the extent of concealed checking or any design change needs to be agreed with the relevant parties.
Prepare a focused request
Give the inspector the address, build stage, cladding type if known and expected timing for the adjoining works. Send the current wall and landscape drawings with the areas of concern marked, such as the high end of a path, a door landing or the corner where mulch will meet the wall. Mention the surfaces that are still temporary and any changes made since the documents were issued. If the builder has provided a product manual or a project-specific detail, send that too so the inspector can distinguish the intended arrangement from what can be seen on site.
Ask for the observation, any access or document limitation and the next action to be recorded clearly. An independent visual inspection can describe accessible conditions and flag an apparent mismatch for the builder to address. It cannot verify concealed flashings, drainage connections, system performance in a storm or a compliance pathway from appearance alone. Agree when the question needs to be resolved and how the finished condition will be recorded. If paving is imminent, give the builder enough notice to compare the drawings with the set-out and identify any required approvals or coordination before the work becomes harder to revisit.
Keep the revision number and date of the drawings used for that comparison. If the paving contractor is working from a landscape plan issued before the wall base was detailed, ask which drawings should now guide the set-out. A marked-up section agreed before the pour is easier to verify later than a verbal instruction about making the path level with a door. Retain the agreed detail with your handover documents for future landscaping changes.
If a drain sits in the transition, include a photo that shows where it runs and which surfaces drain towards it. Give the inspector a view of the other end of the path as well. A low point can sit away from the doorway, so following the full run helps explain where the water is intended to leave.
References
Ask ClearScope about your inspection
Send the address, build stage and timing of the paving or landscaping.
Request an inspection