Dilapidation Before a Temporary Site Drainage Change
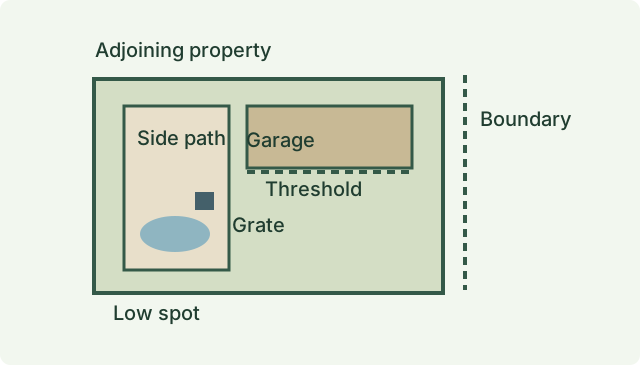
Your neighbour’s site is about to lose a section of paving and the builder says there will be temporary drainage during the work. You have seen water collect near your garage door before and are unsure whether it will get worse. Before the change, build a record that can separate what was visible on the day, what you know from earlier rain, and what the project team says it plans to do. A dry-day inspection can still record the threshold, low spots and older marks that help make sense of wet-day photographs. Start with the part of your property you want to compare once works begin.
Describe the change without assuming which way water will flow
Ask the project contact what will change and when. The work might involve temporary removal of a downpipe connection, a strip of paving being opened, a change at a fence line or a different path for site water while part of the permanent system is unavailable. A detail that looks unchanged from outside may still be affected by work inside the site, so identify where your information came from. A marked site plan, a written description or a dated photograph may be useful. Keep proposed arrangements separate from those already in place when the record is made.
The focus here is visible condition on the adjoining property. If you want to know where a buried pipe runs or how it has been performing, our guide to underground drainage before excavation explains why that is a separate question. Surface water may pass over paving, enter a visible grate, disappear behind a boundary treatment or simply pool. Seeing those features tells you where they are in relation to each other. It does not prove an underground connection, discharge rate or condition of a drain. A plumber or other suitable specialist can advise on what can be established about a particular connection.
Include the areas you could reasonably compare later
Begin with a wide view of the relevant frontage or passage, then walk through the agreed accessible areas in order. Photograph the threshold where you worry water might enter, any lip or change of surface near it, and the route you can see between the threshold and the former wet area. Record whether the paving was dry, damp or covered at the time and identify visible debris, older staining and repairs separately. Photographs should capture fixed details like joints and corners that will let a reviewer identify the same area later. In a narrow gap a safe view from one end may be the best available reference.
On the inside of the garage or adjoining room, consider visible marks low on accessible walls, the floor edge and any previous patch that residents have mentioned. Avoid moving a heavy cabinet or opening a barrier purely for photographs. A picture of an old tide-like line can record shape and location, but appearance alone does not prove when a wetting event happened. Note the reported history and distinguish it from what was visible. If you have invoices or photographs of prior cleaning or water-related repairs, keep them in a separate folder with dates. Record the boundaries of the agreed inspection as carefully as the conditions.
Pair resident photographs with an independent baseline
An occupier’s older photos can be helpful if they show the same corner or opening in similar circumstances. Preserve the originals and any dates available. Include a wide view to match the place and a detail view of the feature that matters. Ask the inspector to identify supplied images separately from images taken at the appointment. A photograph sent without a date can still orient a later reader, provided its date is described as unknown. A message written immediately after a rain event is a useful record of what was reported at that time, with details such as the room affected and where water was noticed.
If suitable safe pictures already exist, provide them rather than trying to recreate an event. No one needs to enter a work zone or stand in floodwater to obtain evidence. A later view taken from a doorway might show the edge of a puddle but say little about where it originated. Ask what area remains inaccessible and whether an alternative view can cover part of it from an agreed location. Our guide to a limited access baseline explains how the report can identify missing views without giving the impression that everything along the property line was inspected.
Keep the site control and condition questions distinct
EPA Victoria explains that exposing or moving soil can increase erosion and sediment risk and that businesses must manage that risk. WorkSafe Victoria’s excavation code also considers preventing flooding or water penetration to adjacent buildings where excavation is involved. Ask the builder or person responsible for the works how temporary surface water and sediment will be managed, who is checking those arrangements and who to contact if something changes. A visual report of your property can be supplied alongside that discussion. It does not design controls, identify a past discharge or approve the project’s arrangements.
If the project includes a permanent change in levels or stormwater layout, have the drawings and agreed arrangements reviewed by the project professionals. Our guide to levels and stormwater during a rebuild explains questions for that broader design. For this inspection indicate which conditions are present before the temporary change and which details are expected to remain visible afterwards. The Building and Plumbing Commission describes how the building surveyor determines whether protection work is required. Confirm the relevant process with that person where applicable. Calling a photographic record protection work does not make it a decision about how the site should be managed.
Keep track of each change, especially if work has already started
Ask whether the proposed temporary change has already begun. If downpipes are already disconnected or the fence-line strip has been disturbed, a report can still record today’s condition with the dates and stages made clear. Identify any earlier information you have and any changes the team has already described. A single photograph taken after a change can be important without representing the original condition. See our guide to a baseline after enabling works if you missed the original window. It helps frame the scope around what is visible now and what can be established from older evidence.
Illustrative example. A garage occupant has old photographs showing puddling near a side path after a downpour. The inspector visits on a dry day before a planned temporary drainage change. The new report shows the existing grate, path joint and garage lip relative to the previous wet area. At a later visit, deposited material is visible near the same joint. The older views support a comparison of appearance and location. They do not demonstrate whether the material arrived from the works, a garden bed or another source. The condition report can flag that question so it goes to the appropriate specialist together with any project records.
Set up the follow-up before you need it
Keep a record of when you first notice a change, what the weather was like if known, the exact area affected and whether anybody cleaned or repaired it before it could be seen. If there is concern about damage, address urgent safety and property protection first. The project contact or relevant service can discuss the appropriate action. For a later inspection, provide the original report and any intervening photographs. Ask for comparison views that match the original where practical, and a note where access or altered finishes mean the same view is unavailable.
Even photographs taken from the same place can look different when the ground is wet or the light has changed. A follow-up may show that a patch appears larger, or it may be impossible to distinguish moisture from shadow in one view. It helps to ask what can be stated with confidence and what would need more information before drawing a conclusion. Our after-work comparison guidance explains why recording appearance and investigating causes can be different tasks. The owner’s photographs, relevant rain records and information on when the temporary measures changed can all inform the next discussion.
Send the right details when you arrange the baseline
Contact the Melbourne dilapidation inspection service with the address, work dates, expected temporary change and areas you can make available. Put any earlier ponding, wetting or staining history in a separate note. Where you know which changes are happening first, describe the sequence. If more than one property may need a record, identify which party has agreed to access at each address and treat each property’s conditions as its own entry.
The useful outcome is a dated reference with recognisable views, a record of any supplied history and clear limits. The report should let someone find the garage threshold, path and other points of interest even if the resident who organised the visit is no longer there. A record of what you cannot see can be as important as the recorded features, because it explains why a later comparison may need plumbing, surveying or another specialist input. Set the scope before the temporary change and keep the records available for the person who will actually need them.
Agree who will keep the photographs and the dates
Send the baseline scope and accessible locations to the person organising the works and agree where information from later events will be kept. A project folder can use one entry per event, with the date, the room or exterior area and the observer’s own description. Keep any measurements or professional findings attached to their original documents. This matters where a tenant first reports wetting but another person later takes photographs and a contractor attends to clean affected finishes.
During handover ask whether permanent drains are now connected, whether the previously visible grate or low point has changed, and which areas can safely be seen again. Use the answers to define the comparison visit. Where part of the original path has been replaced, have the inspection record the new layout and the reason a precise comparison is constrained.
If a boundary gate or exterior step forms part of the usual access route, describe its relationship to the wet area. The important contrast may be between water that stays on a portion of paving and water reported at a particular doorway. That location can guide the next inspection even when there is no reliable estimate of water depth or the timing of the peak flow.
References
Ask ClearScope about your property
Send the address, proposed work, expected start date and any access arrangements you already have.
Request an inspection