Dilapidation Before a Crane Lift: Record the Outrigger Footprint
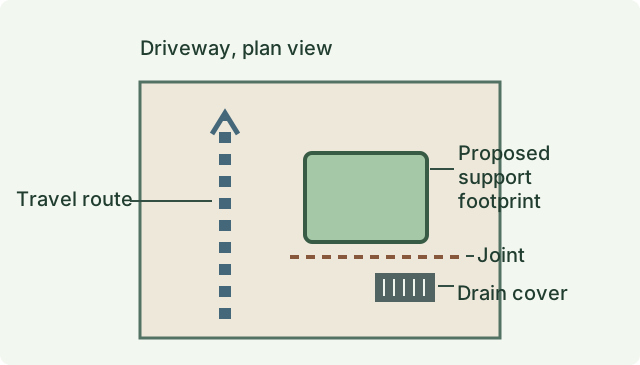
A crane is booked to lift roof trusses onto the build next door. The builder asks to place part of the setup on the paved access beside your garage. You want to know what to record before you agree to access, especially where the paving already dips beside a drain. Record the support footprint separately from the crane’s travel route. Ask the builder for a sketch showing the proposed standing area and which features they expect to cover. That sketch gives an inspector a useful starting point for a dated, visual condition record.
Start with the proposed standing area
A lift might involve several separate areas. One is where the vehicle drives in, turns and leaves. Another is where it stands while the lift takes place. A third is the area occupied by packing or mats under the supports, which may extend past the wheels. Keep those areas distinct on the inspection brief. A photo of the full driveway can be useful context and still miss the paving joint immediately beside a proposed support location. If regular deliveries will use the same access, our guide to shared driveways and heavy vehicles covers that separate record.
Ask for the latest setup sketch and its date. A screenshot of a plan with the proposed area circled is enough to orient the condition inspector. Label which side is the street and which side is the rear. Include the gate, drain, wall or other permanent feature that allows someone to identify the same spot later. If the exact position is still open, ask the builder to outline the areas being considered and explain what may trigger a change. Inspecting the accessible areas under consideration before the booking can make a last-minute change easier to document.
Describe the surface and its edges
Break the area into recognisable pieces. A driveway may have an older concrete bay, a newer patch across a service trench and a narrow strip of brick paving by a garden edge. Each should be visible in a wide photo before the closer views show cracks, joints, spalled corners, worn sealant or missing pieces. A note such as “open joint beside garage wall, between the channel drain and second fence post” gives the reader a practical way to locate the image. Include the apparent direction of any crack, its start and end, and whether it continues into the adjoining surface.
Look for features that a mat or parked vehicle might conceal once the setup begins. Examples include a grate against the garage threshold, the corner of a pit cover, a small retaining edge or a previously patched section. A low-angle view can show the relationship between adjacent surfaces where one side appears higher. Where a scale is safely accessible, include one in the close photo and keep a wider view as well. A camera angle can exaggerate a height difference. If levels matter, discuss a separate survey with a suitable practitioner so the measurement method and reference points are clear.
Record what is visible at grates and service covers
Note the position and visible condition of grates, covers and their surrounds. A cover could be level with one side of the paving and sit proud of the other. A broken corner could be in the surrounding mortar with the frame itself looking intact. Record each observation on its own. If the owner can identify a cover from a plan or recent service invoice, record who supplied that information and the date. Leave the service as unidentified where the documents and markings are inconclusive. The appearance of the cover gives little information about the buried arrangement.
For an already slow drain, ask whether anyone recorded ponding before the lift and whether clearing work or a repair has already been booked. The guide to underground drain baselines explains when a separate inspection such as CCTV may give a useful comparison. Arrange that scope with the appropriate contractor if buried condition is important. A conventional visual dilapidation inspection records accessible surfaces and visible fittings. It generally has no view beneath an intact cover or through a paved slab, and its photographs cannot establish pipe condition or the depth of fill below a support.
Keep the crane assessment with the lift team
Safe Work Australia’s ground conditions guide is written for people responsible for mobile plant and covers recognising hazards and obtaining expert advice. WorkSafe Victoria’s mobile crane checklist also treats supporting ground, nearby excavations and outrigger positions as matters for those planning the setup. Send any useful prior photos or information about excavations, services or repairs to the builder and crane contractor. Those parties can seek the relevant assessment before deciding where the plant can stand. The condition inspection can share what was visible and where, which gives the specialists a better brief.
A visually neat paving surface may conceal an old trench or a chamber. Existing cracking might have been there for years. The inspection report cannot establish bearing capacity, determine mat sizes or give permission for the lift. It also cannot tell from an apparent defect alone whether the proposed loading is suitable. Keep the condition survey appointment separate from the contractor’s setup and plan to take photographs while the property is accessible and the work area is clear. Leave access during a lift to the site team. If the site changes the proposed area, ask them to advise you before it is covered.
Make a second visit useful
Agree on the comparison point before work starts. For a single lift, a practical time might be after the crane, mats and packing have been removed and the area is available for safe access. If the job has several lifts, a check between visits can help identify when an observed difference was first noticed. If paving will be replaced soon afterwards, book the review before that change. Ask for the actual setup sketch or any photographs the contractor already took from a permitted viewpoint. Date the information and keep it alongside the before record.
Revisit the same features using the same approach direction and similar framing. Where a close view shows a new-looking chip, find the corresponding old wide view and then the old close view. Record whether the older photograph actually shows the exact corner. Wet paving, shadow and a moved pot can all change what the camera picks up. List any areas still covered or inaccessible. Our guide to comparison inspections after work sets out what a difference can establish and why conclusions about cause may need further evidence.
Follow the evidence in an illustrative case
Imagine that the contractor proposes a support location near a drain at the garage entrance. Before the lift, the condition photos show a broken corner on the drain’s concrete surround and a joint running away from the grate. The proposed sketch shows the area near that joint, and a wider photo shows the same joint relative to the garage door. The report identifies a covered strip of paving as an access limit because a fixed storage unit blocks the view. The builder passes the drain location and previous plumbing information to the lift team for their own assessment.
After the lift the original broken corner is still visible. The owner also notices an adjacent paver that appears lower than its neighbour. The older wide image includes the paver but has a shadow over the edge. At review, the inspector can record the offset and say the original chip was already present. The older photograph may leave the timing of the paver offset uncertain. The owner can then ask for dated setup records and decide whether a level survey or other investigation is worthwhile. That is a more precise follow-up than trying to explain a low spot from a single photo.
Send the brief while the area is accessible
Include the property address, the lift date, the builder’s contact details, the proposed footprint and any access permissions already discussed. Attach one wide overview, the latest sketch and any dated records of earlier work on the surface. If permission has been granted for only one side of a boundary, identify the boundary as it is understood by the parties and say where the inspector can stand. Avoid asking an inspector to infer permission from a gap in a fence. Our guide to limited neighbour access explains how to document a restricted view.
Ask the parties whether they need a straightforward visual condition record, a wider survey of adjoining property, or a comparison visit once access is available again. The Building and Plumbing Commission explains the Victorian protection work process, including the survey where protection work is required. The relevant building surveyor determines whether that process applies. Where a council footpath or vehicle crossing is also within the site arrangements, the vehicle crossing and kerb guide helps define that record. For the proposed setup itself, share the plan and timing through the Melbourne dilapidation inspection service so the visit can focus on the accessible footprint, adjoining edges and features you can revisit afterwards.
Before confirming the appointment, flag which changes will happen before crane day. If the garage approach will already have had a trench reinstated, ask the builder for the date of that repair and any earlier photos of the area. The inspector can describe the new patch and explain what date the inspection represents. Our guide to baselines after enabling works explains how to label records when early activity has already taken place. This is especially helpful where an owner has images from before the project and the surveyor has images from later, after the surface was patched.
Check how the parties intend to share the record. An annotated plan, numbered photographs and a dated PDF are easier to refer to than a string of compressed messages. Preserve the original photos and send only what is needed to the people involved. Avoid including unnecessary views into a neighbouring dwelling or car registration details. Ask who will receive reports of an apparent change and who can check whether the lift layout moved on the day. That way, if the surface is queried after work, everyone can refer to the same plan version and image number.
If a second lift is already booked, share that date as well so the comparison can be scheduled before the surface is covered again.
References
Ask ClearScope about your property
Send the address, proposed work, expected start date and any access arrangements you already have.
Request an inspection